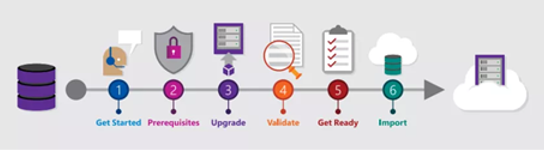
Microsoft has published a migration manual for the migration from TFS to Azure DevOps. The process is subdivided into six phases, which are easy to follow. The manual details all of the steps that are required to carry out the migration yourself. The following is a brief outline of those steps.
A Microsoft Partner for the Migration to Azure DevOps?
In the migration manual, Microsoft points out that joining forces with a certified Microsoft Partner is always recommended. A Microsoft Partner specialized in Azure DevOps knows the steps required, the pitfalls, and the Services and tools that best match the requirements and challenges of your organization. A Microsoft Partner can help you to get the maximum out of Azure DevOps.

1. Get Started
This phase is all about preparing for the migration. You choose a location for your Azure DevOps Services organization data. You find out which licenses you need, and you establish the name of your Azure DevOps environment. You can then download the TFS Migrator Tool.
2. Prerequisites
The second phase focuses on the requirements for migrating your data to the cloud. Your team must have an active Azure Active Directory tenant which is used for authentication of your team members. By synchronizing your local Active Directory with your Azure Active Directory, team members can use the current login details.
3. Upgrade TFS
You cannot just migrate from every version of TFS to Azure DevOps Services. You need to start by upgrading TFS to a version that is supported by the TFS Migrator Tool. We recommend upgrading to the latest version of Azure DevOps Server.
4. Validation
Once you have upgraded to a supported version of Azure DevOps Server, the database needs to be validated for the migration. The TFS Migrator Tool is used to carry out verifications and to identify any errors. Any errors that are found must be repaired at this stage.

5. Get Ready
Nearly there! In this phase, you need to make preparations for the dry run and the final imports. You can use the TFS Migrator Tool to generate the import settings and related files. This involves creating an Azure Storage Container in the same data center as your ultimate Azure DevOps Services organization.
We recommend that you use this phase to prepare thoroughly for the new environment and to ensure that all subscriptions are properly organized.
6. Import
Time for the final phase: the import. You must start by completing a dry run. You should monitor how long each step takes so that you can schedule the final import properly. But what are the steps?
You must first disconnect the Team Project Collection in the Administration Console. You should then make a backup of the Team Project Collection SQL Database and then upload the SQL Database and Identity Map to your Azure Storage Container.
You then need to generate a shared access signature (SAS) key for your Azure Storage Container and populate the final fields of your import specifications (such as your SAS key and the name that you chose in phase one).
In the end, you configure the invoicing settings based on the subscriptions that you identified in phase five. Finally, you need to create the new connection – from your on-premise servers to the Azure DevOps Services environment that you have just imported.